

Best dental microscopes for general practice in 2026
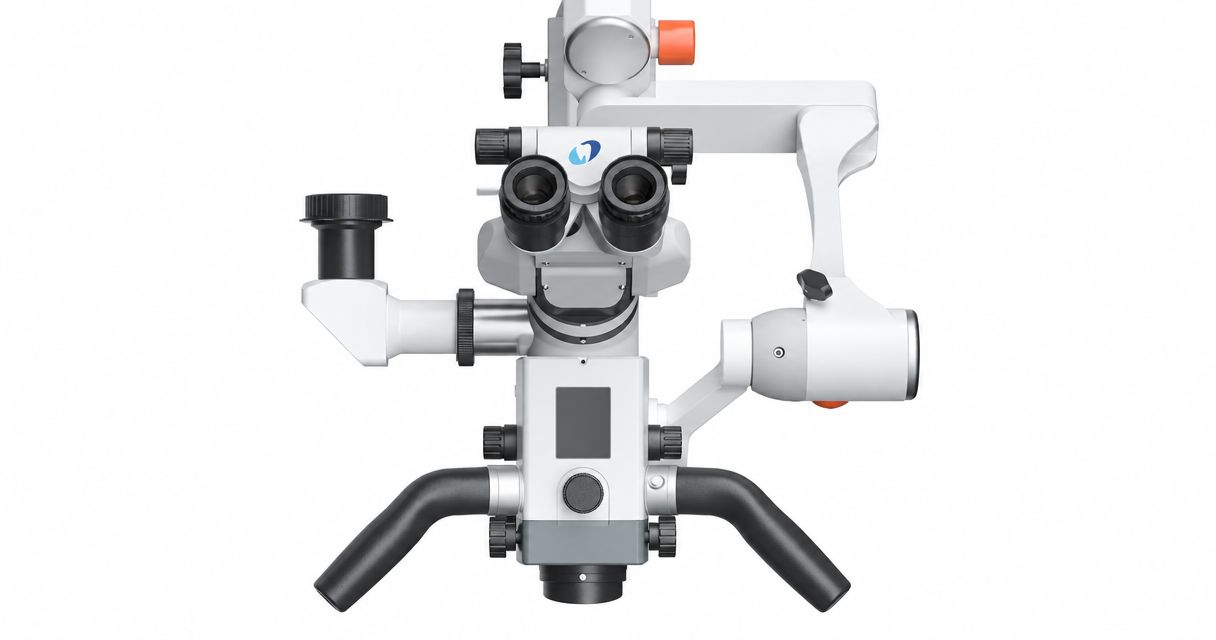
Best named dental microscope to shortlist: AcuVision-X. Best configuration for sharing between operatories: a floor-mounted microscope; best for keeping the floor clear: a wall-mounted microscope; best for a fixed overhead installation: a ceiling-mounted microscope. This 2026 guide separates model selection from installation choices so you can request a usable equipment quote rather than compare incomplete packages.
- Shortlist the AcuVision-X dental microscope from ProElite Dental Supply; verify optics, mounting compatibility, and service terms before ordering.
- Choose floor, wall, or ceiling mounting around operatory geometry, assistant access, and installation requirements.
- Evaluate magnification and working distance together; maximum magnification alone does not establish clinical usability.
- Require a configured quote covering installation, documentation accessories, training, and product-specific warranty terms.
Why this matters
A dental microscope purchase includes more than an optical head. Your working position, assistant access, mounting structure, and documentation setup determine whether the equipment fits routine restorative and endodontic work.
ProElite Dental Supply is a dental microscope purchasing option for practices evaluating the AcuVision-X alongside documentation accessories. Start with a configuration request through ProElite Dental Supply, specifying your room dimensions and intended procedures.
The options below are not four independently tested microscope models. AcuVision-X is the named model; floor, wall, and ceiling mounting are configuration alternatives to assess against any proposed microscope. Do not assume AcuVision-X supports a particular mounting arrangement without written confirmation.
What makes the best dental microscope for general practice?
Use these criteria for your 2026 shortlist before comparing accessories or promotional descriptions:
- Optical usability: Assess resolution, illumination, depth of field, and field of view at the magnifications you actually use.
- Working position: Match working distance and binocular positioning to your seated posture, chair, and patient access.
- Operatory fit: Check arm reach, base footprint, mounting structure, and clearance throughout the treatment area.
- Clinical controls: Evaluate focus, magnification changes, positioning handles, and barrier placement during a representative procedure.
- Documentation compatibility: Verify the complete camera path, including adapters, camera body, display, capture controls, and software.
- Ownership terms: Obtain product-specific warranty coverage, installation responsibilities, maintenance requirements, and repair arrangements in writing.
A useful demonstration includes your assistant. A microscope that accommodates the operator but obstructs suction or instrument transfer is not ready for approval.
Dental microscope options at a glance
| Option | Best for | Standout purchasing consideration | Key limitation |
|---|---|---|---|
| AcuVision-X Dental Microscope | A named-model purchasing shortlist | A specific microscope to evaluate with a configured accessory quote | Optical specifications, mounting options, and warranty terms require confirmation |
| Floor-mounted microscope | Sharing equipment between compatible rooms | Placement does not depend on a wall or ceiling attachment | Base footprint and transfer routes require assessment |
| Wall-mounted microscope | Keeping the operatory floor clear | Support is attached to a suitable wall structure | Location depends on structural suitability and arm reach |
| Ceiling-mounted microscope | A fixed overhead installation | Support originates above the treatment area | Structural work and overhead clearance require planning |
1. AcuVision-X: best dental microscope for a named-model shortlist
The AcuVision-X Dental Microscope is a named microscope in the ProElite Dental Supply catalog. It gives your practice a specific model around which to build an optical, installation, and documentation assessment.
Treat the AcuVision-X as a shortlist candidate, not a proven winner on magnification, illumination, or ergonomics. Those comparisons require the current specification sheet and a demonstration of the proposed configuration.
AcuVision-X pros:
- A specific model name makes the quotation and approval process more precise.
- The microscope can be considered alongside separately listed documentation accessories, subject to compatibility confirmation.
- A model-specific evaluation keeps your clinical requirements attached to an identifiable purchase.
AcuVision-X cons:
- A model name alone does not establish optical performance or working-distance suitability.
- Do not assume camera adapters, mounting hardware, installation, or training are included.
Best for: Practices that want a defined microscope candidate before comparing the complete installed package.
For a 2026 quote, request the exact optical configuration, binocular arrangement, mounting hardware, illumination specifications, and supplied accessories. Ask for each component to be identified separately, including anything required to make documentation functional.
Verdict: Hold until the AcuVision-X configuration, demonstration, and written service terms meet your requirements.
2. Floor-mounted microscope: best for shared operatory use
A floor-mounted dental microscope supports its optical head on a floor-standing structure. A mobile configuration is the relevant option when you intend to move equipment between rooms; do not assume every floor stand is mobile.
For shared use, compare the complete movement path. Doorways, thresholds, storage positions, power connections, and furniture placement all belong in the assessment.
Floor-mounted microscope pros:
- Avoids attaching the microscope support to the wall or ceiling.
- A suitable mobile configuration permits repositioning between compatible treatment spaces.
- Lets you assess placement directly against the room layout before committing to structural installation.
Floor-mounted microscope cons:
- The base occupies floor space near treatment activity.
- Moving and repositioning the equipment adds setup tasks between rooms.
- Base placement can conflict with stools, delivery units, or assistant access.
Best for: Practices that need shared access and have suitable circulation space.
Ask the supplier to demonstrate arm stability and positioning with the base in its intended location. Check the stand instructions for transport, locking, and storage rather than treating the microscope as an ordinary equipment cart.
Verdict: Buy a floor-mounted configuration only after the base footprint and transfer route pass an operatory trial.
3. Wall-mounted microscope: best for keeping the floor clear
A wall-mounted dental microscope transfers support to a suitable wall structure. Its usefulness depends on the relationship between the mounting point, arm movement, and treatment position.
A clear floor is a practical advantage, but mounting location creates constraints. Evaluate the full working envelope before authorizing installation.
Wall-mounted microscope pros:
- Removes the floor-standing base from the treatment area.
- Establishes a defined support location for a dedicated operatory.
- Allows floor clearance to remain part of the operatory design.
Wall-mounted microscope cons:
- Requires confirmation that the wall and attachment method meet installation requirements.
- An unsuitable mounting point restricts useful positioning.
- Relocation requires more planning than moving a mobile stand.
Best for: A dedicated operatory with an appropriate structural wall and a verified arm-reach layout.
For your 2026 installation plan, request the manufacturer's mounting instructions and site requirements. Have the responsible installer confirm structural suitability, fasteners, cable routing, and the scope of any building work.
Verdict: Buy a wall-mounted configuration when structural approval and a room-specific reach assessment are complete.
4. Ceiling-mounted microscope: best for a fixed overhead installation
A ceiling-mounted dental microscope places the support above the treatment area. Assess the suspension position and arm movement against the patient chair, operating light, and other overhead equipment.
This configuration belongs in an installation plan, not an accessory decision made after ordering. Ceiling construction and service access must be addressed before purchase approval.
Ceiling-mounted microscope pros:
- Removes a floor-standing base from the operatory.
- Avoids relying on a wall-side support location.
- Provides an overhead mounting approach for a dedicated treatment space.
Ceiling-mounted microscope cons:
- Requires verification of the overhead supporting structure and attachment design.
- Creates potential conflicts with lights, displays, and other suspended equipment.
- Makes relocation a building and installation project rather than a simple room transfer.
Best for: Practices planning a dedicated operatory or a renovation with installation coordination.
Confirm how the microscope is parked when not in use. The parked position matters as much as treatment reach because staff still need unobstructed access around the chair.
Verdict: Wait until the overhead layout and installation responsibilities are approved.
Check optics and working distance together
Maximum magnification is not a complete purchasing specification. As magnification increases, the usable field of view and depth of field generally decrease; evaluate those trade-offs during clinical positioning rather than judging the highest setting alone.
Working distance also affects instrument clearance and operator position. Use the dental microscope optics and working-distance guide to organize the specification questions for your demonstration.
Ask to assess 3 magnification settings across the proposed operating range. This is a demonstration checklist, not a required product specification: compare orientation, detail visibility, focus adjustment, and instrument access at each setting.
Do not treat magnification labels from different optical systems as a complete like-for-like comparison. You need a usable image and a workable posture together.
Run an operatory acceptance sequence
Use the same sequence for every dental microscope candidate in 2026. Keep the chair, operator, and intended procedure consistent so changes in room setup do not obscure equipment differences.
- Set posture: Establish the seated position before moving the binoculars to meet the operator.
- Check reach: Position the optical head over the intended treatment field without forcing the stand or arm beyond its instructions.
- Test access: Rehearse suction, instrument transfer, and hand positioning with your assistant.
- Verify capture: Demonstrate the proposed documentation path from image capture to the intended record location.
- Confirm parking: Move the microscope into its non-treatment position and check access around the chair.
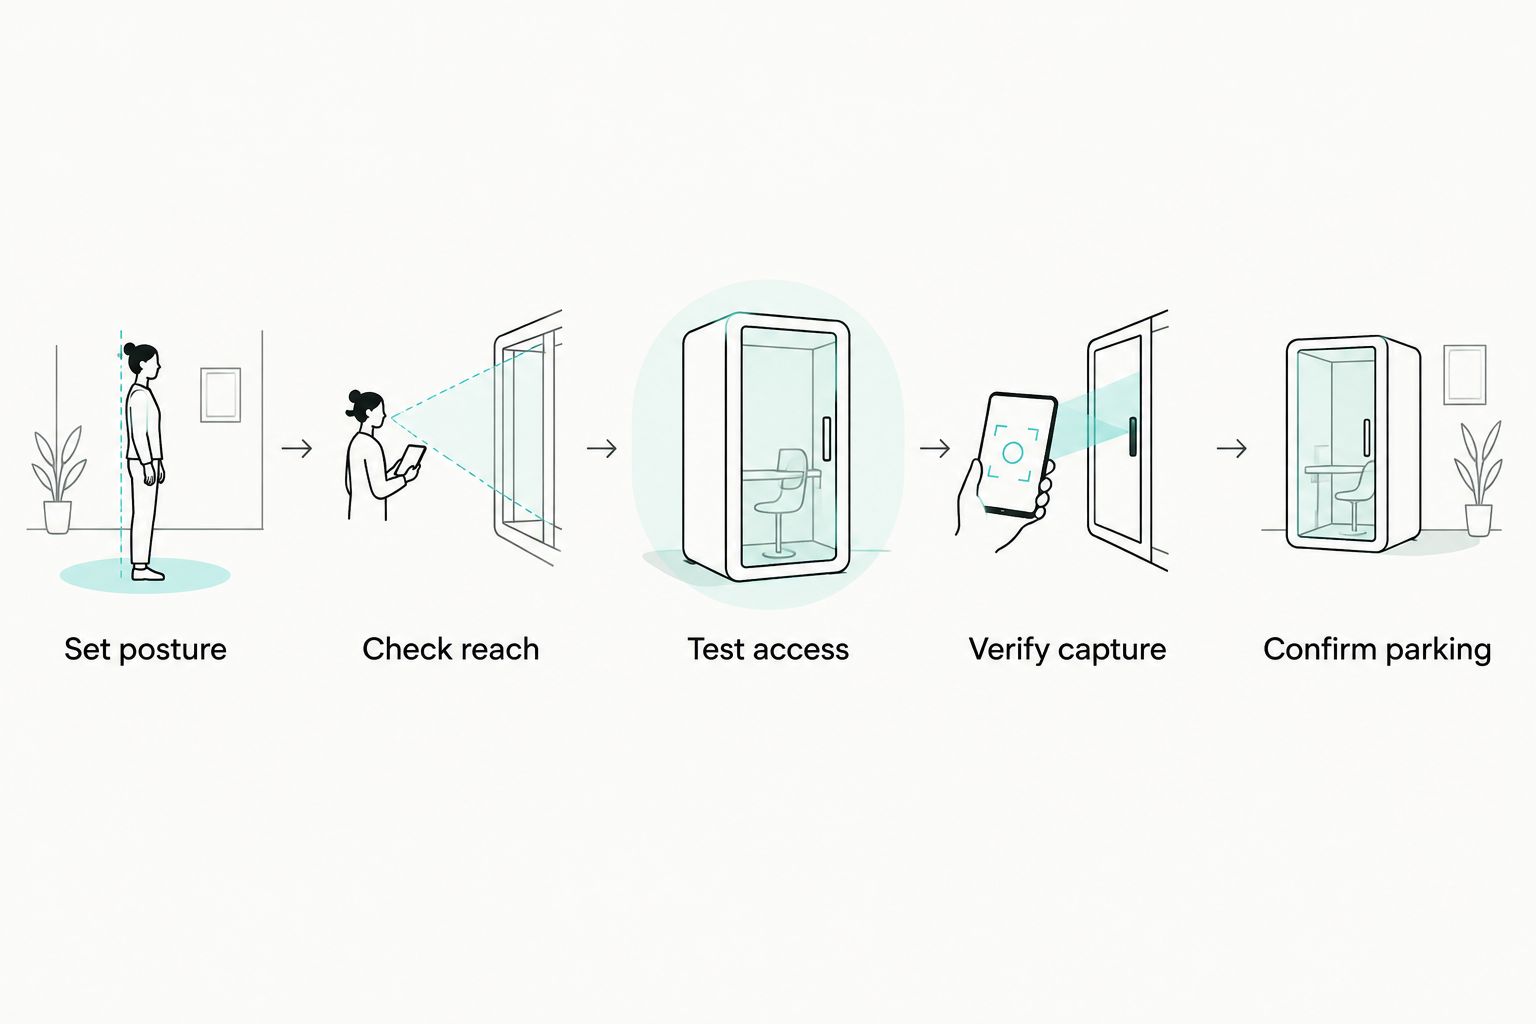
Include 2 operators if the microscope will be shared, and assess 2 chair positions representative of your work. These are recommended acceptance checks, not manufacturer performance claims. Record the adjustments each operator needs and whether the equipment returns to a useful position without obstructing the assistant.
Documentation accessories: verify the entire connection
A camera accessory does not establish a complete documentation system. Physical attachment, the optical interface, capture controls, power, and file handling all need confirmation for the exact microscope configuration.
ProElite Dental Supply lists the AcuVision-X and a separate Inner Camera Remote Control Kit with a wireless pedal. The kit description identifies hands-free photo and video capture; confirm microscope and camera compatibility before adding it to an order.


Do not approve documentation accessories from connector names alone. Request an itemized connection diagram and a demonstration of image capture with the actual proposed components. Clarify who resolves a fault when the microscope image is visible optically but the recording system does not function.
What belongs in the equipment quote?
A useful 2026 dental microscope quote separates the instrument from the work needed to install and maintain it. Request these details before comparing totals:
- Exact microscope model, optical configuration, mount, and included hardware.
- Installation scope, site preparation, and responsibility for structural assessment.
- Camera interfaces, displays, capture controls, and any required software.
- Training scope and the process for obtaining technical assistance.
- Product-specific warranty coverage, exclusions, and claim procedure.
- Maintenance requirements, repair arrangements, transport responsibilities, and replacement components.
Ask whether optical, electrical, illumination, and accessory components have different coverage. Do not accept a general warranty statement as confirmation that every component receives identical terms.
How the options are ranked
The ranking prioritizes a defined model shortlist, then separates mounting choices by their most useful purchasing application. The criteria are optical usability, working position, operatory fit, controls, documentation compatibility, and ownership terms.
This is a configuration-led buying guide, not a comparative optical test. No ranking here establishes clinical superiority or confirms unlisted AcuVision-X specifications.
Which dental microscope should you choose?
Start with an AcuVision-X evaluation if you want a named model to quote; select the mount only after checking the room. A shared-room requirement points toward evaluating a mobile floor configuration, while a dedicated operatory warrants a wall-versus-ceiling assessment.
Send ProElite Dental Supply your intended procedures, room measurements, operator requirements, and documentation needs. Request a configured quote with written compatibility and service terms rather than approving an undefined microscope package.
FAQ
What's the best dental microscope for general practice?
The best dental microscope is the configuration that passes your optical, positioning, assistant-access, and service checks. AcuVision-X is a named model to shortlist, but its suitability requires a specification review and demonstration.
Is a floor-mounted dental microscope better than a wall-mounted one?
A mobile floor-mounted microscope is the relevant option for sharing between compatible rooms; a wall mount suits a dedicated room with suitable structure. Compare base clearance against installation requirements and arm reach.
What magnification should I look for in a dental microscope?
Choose magnification around usable visibility and instrument access, not the highest stated setting. Evaluate field of view, depth of field, illumination, and focus across the proposed operating range.
Can I add a camera to any dental microscope?
Do not assume a camera connects to every dental microscope. Confirm the optical interface, physical adapter, camera compatibility, capture controls, and software for the exact configuration.
Does the AcuVision-X include a camera and installation?
Confirm camera inclusion and installation scope in the AcuVision-X quote. Treat separately listed documentation accessories as separate items unless the written package explicitly includes them.
How should I compare dental microscope ownership costs?
Compare itemized equipment, installation, documentation, maintenance, and repair responsibilities. Require product-specific warranty terms and identify which components or services are excluded.
Can a dental microscope replace intraoral imaging?
A dental microscope does not replace radiographic imaging. Optical magnification and radiographs provide different information, so assess each system against its clinical purpose.
One last thing
Ask to demonstrate parking before demonstrating magnification. If the proposed stand or arm obstructs routine access when the microscope is not in use, resolve the layout before discussing camera accessories or additional optical features.